XBSX2 Setup Guide
What is XBSX2?
XBSX2 is an emulator that allows you to play PlayStation 2 (PS2) games on your Xbox Series X|S, taking advantage of the hardware to provide smooth gameplay with features such as:
- Higher resolutions (up to 4K)
- HD texture packs
- 60fps patches
- Multiplayer (local and online)
XBSX2 (PS2)
NTFS USB recommended for games and BIOS, PS2 BIOS required.
- High-res rendering, HD textures, 60fps patches on Series X/S
- External USB improves load speeds
- Runs best when set to Game type in Dev Home
- Xbox One hardware is underpowered for most titles
- Missing BIOS prevents game boot
- Incorrect NTFS permissions can block USB access
After install, change app type to Game and keep BIOS/games on NTFS USB for space and speed.
Requirements Checklist
Xbox Series X|S
Make sure you have an Xbox Series X or Series S. Note: Xbox One can run some PS2 games, but it's not powerful enough for most of them.
External USB Drive (Optional but Highly Recommended)
You will need a properly formatted USB drive to store the BIOS, games and other files. The USB drive must be formatted in NTFS and have the correct permissions - see the Xbox Developer Mode Setup guide. We recommend using an external SSD for smoother performance when using HD textures or large games.
Developer Mode on Xbox
To run homebrew applications such as XBSX2, you need to enable Developer Mode. This allows you to install applications that aren't available from the Microsoft Store. If you haven't enabled Developer Mode yet, don't worry - we've got you covered here.
Setting up XBSX2 on Xbox
Download the Necessary Files
On your computer, use one of the following sources:
- Emulation Revival Store (recommended): Go to XBSX2 on Emulation Revival Store, pick the correct build for your console (Series vs One), and click Download.
- GitHub (alternative): Use the latest XBSX2 release.
Pick the msixbundle that matches your console. Releases ship two builds (AVX2 for Xbox Series and SSE4 for Xbox One). Using the wrong one can crash or perform poorly.
Download only that msixbundle. Recent Xbox Emulation Hub releases do not ship separate dependency .appx files - the bundle you select is sufficient for Device Portal sideload.
Transfer the Files to Xbox
In order to install XBSX2 on your Xbox, you'll need to use the Xbox Device Portal on your computer.
- Go to Xbox Dev Mode on your Xbox. Look for the IP Address of your Xbox on the Developer Home Screen (it looks like 192.168.x.x/10.0.x.x).
- On your PC, open a web browser and enter the Xbox IP address in the URL bar. This opens the Xbox Device Portal.
- Sign in using your Xbox Developer credentials.
Upload XBSX2
In the Device Portal, go to My Games & Apps - Add - Choose File, select your *.msixbundle, click Next, then Start. If GitHub/release notes describe extra packages, add them too. Typical XEH builds are bundle-only.
Troubleshooting: If installation stalls, refresh Device Portal and try again.
Setting Up BIOS Files
A BIOS file is a core system file for running PS2 games. You'll need to legally obtain a PS2 BIOS from a PlayStation 2 console you own.
Getting Your PS2 BIOS File
XBSX2 requires a legally-obtained PS2 BIOS, which must be dumped from a PlayStation 2 you own emulators cannot provide this due to copyright. For official guidance on dumping and using a BIOS, see the PCSX2 setup documentation:
https://pcsx2.net/docs/setup/bios
Option 1: Using a USB drive
- Format your USB drive to NTFS and apply permissions. Click here if you don't know how to do this.
- Create a folder named XBSX2 on the USB drive.
- Inside that folder, create another folder called BIOS.
- Copy the PS2 BIOS file to the BIOS folder on your USB drive.
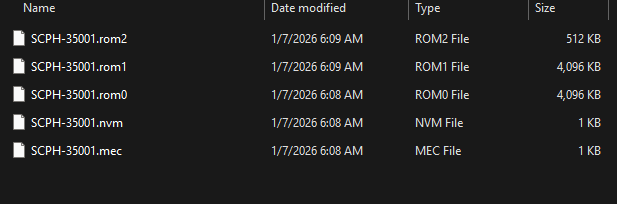
- Make sure your BIOS should be like in the Picture.
Option 2: Internal storage
Upload the PS2 BIOS file using the Xbox Device Portal:
- Go to Dev Portal > File Explorer > LocalAppData > XBSX2 > LocalState
- Create a BIOS folder (if it doesn't already exist).
- Copy the BIOS files into this folder.
Configure BIOS on Xbox
- Plug the USB drive into your Xbox.
- Open XBSX2 on the Xbox.
- Navigate to Settings > BIOS Directory.
- Point the BIOS directory to the BIOS folder on your USB drive or internal storage.
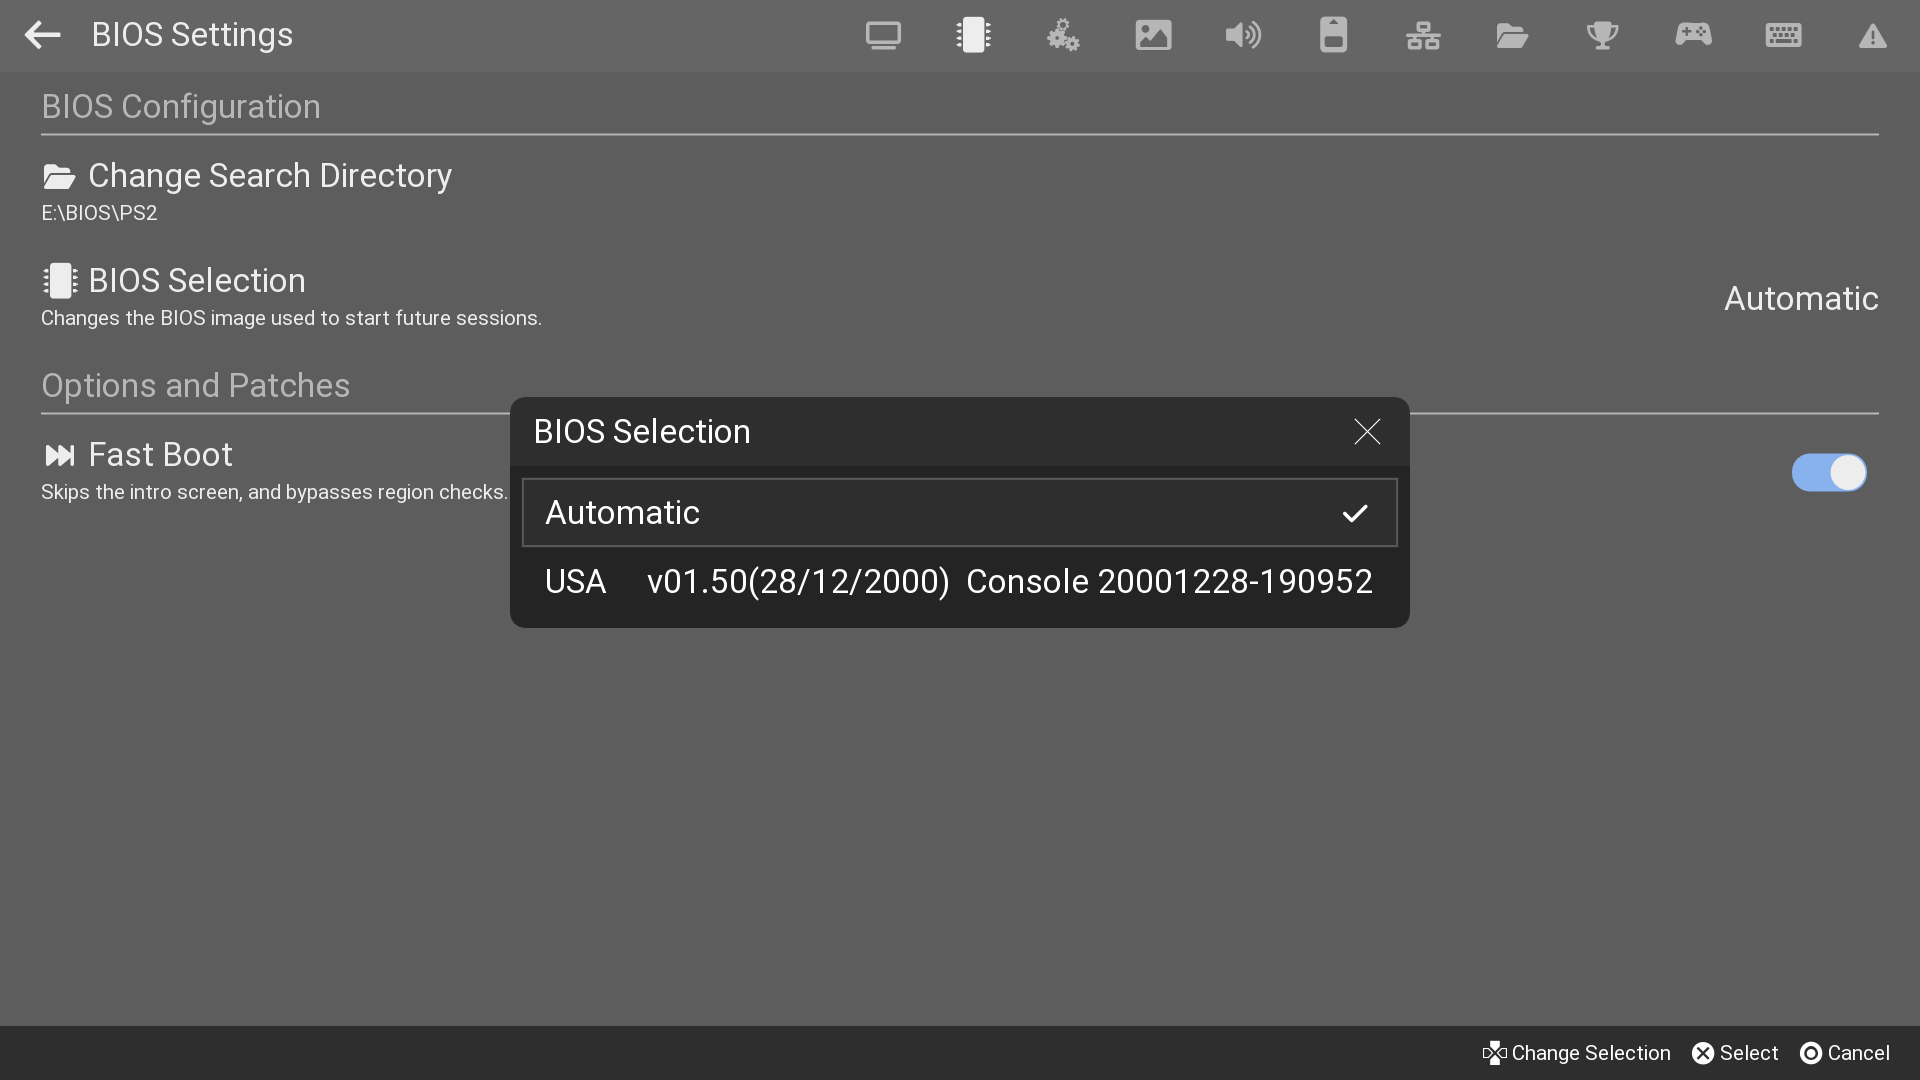
- Once You've done BIOS Part then Click BIOS Selection to see if your BIOS show up like this:
If your BIOS does not show up then you need to redump your BIOS.
Adding PS2 Games
You need to legally dump your PS2 games. If you have physical PS2 discs, you can use a tool like ImgBurn on a PC to convert them into ISO files. Your ROMs should be ISO, BIN/CUE, or CHD files.
Option 1: Transfer Games via USB
- On your USB drive, create a folder named Games.
- Inside the Games folder, create another folder called PlayStation 2.
- Copy your PS2 game ISOs into the PlayStation 2 folder.

Option 2: Upload Games to Internal Storage
Use the Xbox Device Portal to upload games:
- Go to Dev Portal > File Explorer > DevelopmentFiles > WindowsApps > XBSX2.
- Create a folder named Games in this directory.
- Upload the ROMs as .ISO, BIN/CUE, or CHD files.
You can upload them as .zip files, and the Dev Portal will prompt you to unzip them automatically.
Configure Games Directory on Xbox
- Open XBSX2 on your Xbox.
- Go to Games List > Games Directory Tab.
- Point the games directory to the PlayStation 2 folder on your USB drive or the Games folder in internal storage.
Configuring Memory Cards
To save your games in XBSX2, you need virtual memory cards.
Option 1: USB Memory Cards
- On your USB drive, go to the XBSX2 folder.
- Create a folder named MemoryCards.
Option 2: Internal Storage Memory Cards
Using the Xbox Device Portal, go to Dev portal > File explorer > LocalAppData > XBSX2 > LocalState. Create a MemoryCards folder (if it doesn't exist).
Set Up Memory Cards in XBSX2
- Open XBSX2 on your Xbox.
- Navigate to Settings > Memory Card Settings.
- Set Slot 1 to use the MemoryCards folder on your USB drive or internal storage.
Tip: Use folder-based memory cards so you never run out of save space.
Controller Setup
Mapping the Xbox Controller
- Open XBSX2, go to Settings > Controllers.
- In Controller Port 1, set the controller type to DualShock 2.
- Use Automatic Mapping to automatically map the Xbox controller buttons to their PS2 counterparts.
You can also manually customize each button mapping for more control.
Multiplayer Setup
For multiplayer, set up the controllers as:
- Player 1: Controller Port 1
- Player 2: Controller Port 2, and so on.
Enable the Multitap setting if you plan on using more than 2 controllers.
Adding Cheat Codes
Find and Download Cheat Codes
Find cheats for your desired games. Recommended websites:
- Emulation Collective Discord
- Revives Community Server Discord
- Gamehacking.org
- PCSX2 forums
Download the cheats in PCSX2 PNACH format.
Rename the PNACH File
Each game has a unique identifier called a CRC32 code. To apply the cheat code to your game, you must rename the downloaded PNACH file to match the CRC32 code of your game.
Finding the CRC32 Code:
- Open XBSX2 and navigate to your game list.
- Highlight the game in question and press Y (or the menu button).
- The CRC32 code will be displayed on the right side of the screen. Write it down.
Edit the Cheat File (Optional)
If you want to manually add or tweak cheats:
- Open the PNACH file in a text editor (e.g., Notepad).
- Cheats are written as follows:
patch=1,EE,XXXXXXXX,extended,YYYYYYYY
- Replace XXXXXXXX with the memory address and YYYYYYYY with the cheat value.
Option 1: Add Cheats to USB
- Go to the XBSX2 folder on your USB drive.
- Create a subfolder called Cheats.
- Place the renamed PNACH files in the Cheats folder.
Option 2: Add Cheats to Internal Storage
Use the Xbox Device Portal to access: Dev Portal > File Explorer > LocalAppData > XBSX2 > LocalState Create a Cheats folder here (if it doesn't exist) and add the PNACH files.
Enable Cheats in XBSX2
- Plug the USB drive back into your Xbox.
- Open XBSX2 and go to the Cheats Menu.
- Enable the desired cheats from the list, then launch the game.
Applying 60FPS Patches
Some PS2 games run at 30fps by default. With 60fps patches, you can double the frame rate.
Find 60FPS Codes
Go to forums like the PCSX2 forums or GameHacking.org. Search for the 60fps patch for your game
Add the 60FPS Patch to the Cheat File
If you find the 60fps patch in raw format (hex codes), add it to your PNACH file as follows:
- Open the existing PNACH file for the game.
- Add a new line:
patch=1,EE,XXXXXXXX,extended,YYYYYYYY
- Replace the XXXXXXXX and YYYYYYYY with the values provided by the patch.
Option 1: Transfer by USB Drive
- On your USB drive, create a folder named Cheats inside your XBSX2 folder.
- Copy the renamed PNACH file into the Cheats folder.
Option 2: Transfer to Internal Storage
Use the Xbox Device Portal to upload the PNACH file:
- Go to File Explorer > LocalAppData > XBSX2 > LocalState.
- Create a Cheats folder (if it doesn't exist) and upload the PNACH file there.
Enable 60FPS Patch in XBSX2
- Open XBSX2 on your Xbox.
- Go to the Cheats Menu.
- Toggle the 60fps patch and launch the game.
Setting Up HD Texture Packs
HD Texture Packs replace the original textures in PS2 games with high-resolution versions, making old games look sharper and more detailed.
Prepare the Texture Pack
Once ready, the files should be in a folder named after the game's SLUS/SLES code (you can find this code on the game's box or in XBSX2 under Game Details).
Option 1: Add Textures via USB
- On your USB drive, go to the XBSX2 folder.
- Create a subfolder named Textures.
- Inside the Textures folder, add the folder with the game's SLUS/SLES code.

Option 2: Upload Textures to Internal Storage
Use the Xbox Device Portal to upload the texture files. Go to Dev Portal > File Explorer > LocalAppData > XBSX2 > LocalState > Textures. Upload the game-specific texture folder here.
Enable HD Textures in XBSX2
- Open XBSX2 on your Xbox.
- Go to Settings > Graphics.
- Toggle Enable Load Textures.
- Launch your game, and the HD textures will automatically be applied.
Recommended settings
Widescreen Patches
Enable Widescreen Patches for games that didn't support widescreen natively. In Settings > Graphics, toggle Enable Widescreen Patches. This stretches the image without distorting the game.
Frame Pacing and Vsync
For smoother performance, enable Optimal Frame Pacing in Settings > Performance. Turn on Vsync to prevent screen tearing, which can occur when the game's frame rate doesn't match the TV's refresh rate.
Resolution and Performance Tuning
In XBSX2, you can change the internal resolution (e.g., from native PS2 resolution to 1080p or 4K) to enhance game visuals. Go to Settings > Graphics and adjust the Internal Resolution to 2x, 4x, or even 8x native resolution for crisper textures.
Higher resolutions may reduce performance, especially in demanding games.